Tuesday 26 April 2011

Insulation and plylining


We have bought 6 sheets of 2.4mx 1.2m x 25mm celotex on ebay. We plan to use this for most of the insulation. I have also bought 2 rolls of 2mm foam underlay from B and q and we have got about half a roll of rockwool which someone gave us.
Our plan is to stuff rockwool into all the metal struts, then cover them with foam. Cut out celotex to fit the big panels, stick them in place with soudaflex (a sikaflex equivalent) and foil tape round the edges.
We will use 6mm ply for the sides and roof, screwed into the metal foam covered struts

For the floor we will just use celotex in between some 25x 50mm battens which will be stuck down with soudaflex . On top of this will be 9mm ply.


Finding weights to make the battens stick down was hard!


 Battens mostly stuck

 Cutting out the template for the ply


 Celotex sheets cut and lying in place with a space for the woodburner, which we are too scared to do at the moment. At some point we will need to get some bolts through here to hold the burner down.


If we were going to do this again we would cut out the ply first, then stick the battens down, as you need to know where the joins between the ply sheets are going to be so you can screw into them. We ended up adding a few more battens because they were in the wrong places!


Rockwool stuffed into the struts and celotex sheets in place- we cut them so they would be a tight fit vertically and would need less glue to keep them in place


   We got paranoid about water vapour and sealed all the celotex and rockwool inslutation in place using silver foil insulating type tape. We used about 5 rolls!
We covered all the big bits of rockwool with either 2mm underfloor foam stuck on with glue (evostick 528 I think, from Jewsons), old camping mats or silver foil bubble wrap. This was to seal it in place, to act as a vapour barrier and to prevent any bare metal from being present to get cold and to condense any water.  The van now looks like a space ship! The silver foil bubble wrap was expensive, so was only used in the areas near where the wood burner will be and on any surfaces which would not be able to be covered by ply lining (like the side door and some on the metal struts).


Nice posing Keef.  The battens were an absolute nightmare to get on! We broke about 3 drill bits, including a titanium one which was supposed to be unbreakable! (Apparently you should drill slowly into metal, using oil to stop the bit getting hot and should not press too hard. We didn't know this). In the end we mostly used self tapping 20mm screws and brute force to get the battens up.
We have put thin plywood battens (about 4mm left over from the old van plylining) in on the edges of some of the struts. This is to pad out to make a flatter surface for the ply, to enable us to glue the ply in some places and to give a bit more strength. We didn't want to lose lots of space by putting thick battens in on the sides, and didn't want to glue directly to the metal (we covered all the metal with foam to stop it getting cold), but did want a bit of extra strength. We put a few extra battens glued onto the back of the ply so that we can have a bit of a thicker attachment for any cupboards. The ply was attached to the horizontal battens by self tapping screws (10mm) and glued as well. This was strong enough to hold it without having to bother drilling into metal again.


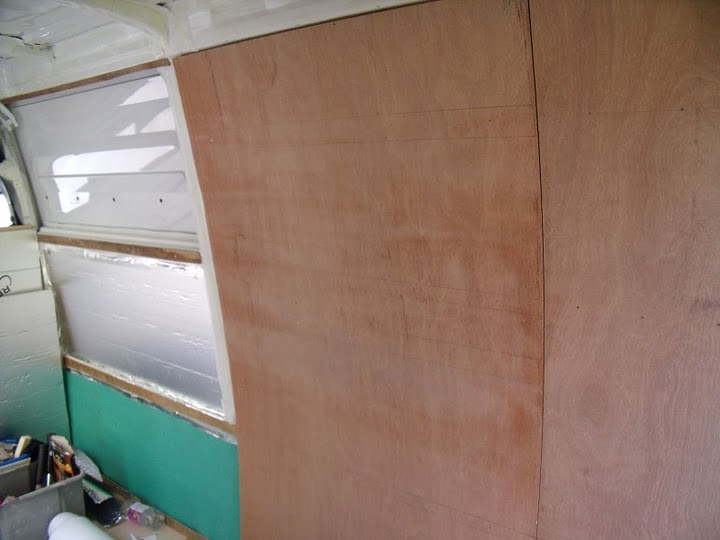
We drew in pencil where any metal or wooden struts were, so that we can attach things to them later.


(this is a weird sideways picture of the roof)
Now the roof vent has stopped leaking (we hope) we have put up the ceiling.
We decided to use battens on the metal struts width ways. We were originally going to have battens lengthways, but decided against this in the end as we used 5.5mm ply for the ceiling and it didn't sag or need that much support.
We stuck celotex insulation on with the soudaflex glue and put up some temporary lengthways battens to hold it in place while it dried. We then took out the temporary battens and put up the plywood. It didn't fall off and has not looked dangerous yet!


The roof vent is looking better now and in the background you can see the overhead cupboard and clear perspex window that separates the cab.


To join the gap between the ceiling and the sides we have put a wooden strip of coving.
We have started to wire in the lights behind the coving.

I think we are finally done with insulation and plylining (apart from the side sliding door, which we can't decide what to do with. It has taken about 2 months worth of weekends (although not every weekend), so be warned it is not a quick and easy job!
Now we can get on with painting. Hooray!


Friday 15 April 2011

Mechanical stuff and rust removal

We have finally got the van back from Dave the mechanic (it has only taken him 2 weeks!). We were so lucky we took the van to get checked as it had a cracked engine mount and the engine could have fallen out at any point! I thought it sounded a bit crunchy going over bumps. I really don't think it should have passed the M.O.T.

We got him to change the oil on the gear box, rear differential and engine, engine and fuel filters, break fluid and 2 engine mounts and it cost about £320 in total. Lucky we budgeted £500 for this type of thing.

We have decided to call the van Dave, as we have spent so much time over the last 2 weeks trying to get hold of Dave the mechanic that the name has sort of stuck now.

So now finally we can get on with stage 2 of the plan. Rust removal, cleaning and stripping the plylining out.


There was quite a lot of rust, especially on the wheel arches. We stripped it with this whizzy tool thing and some sandpaper (we were not too obsessive about it), gave it a clean and then painted with hammerite primer.

 Nice posing Keef


 Keef came up with the phrase " I can do anything with a hammer". Whereas I am more interested in the smaller jobs requiring a paint brush.


 What a mess! Full of animal feed, mud and rust.


 Cleaned and painted with Hammerite primer

Painted in white Hammerite
We tried some proper white car spray paint, but used an entire can and didn't get very far, so decided that it didn't matter if the paint wasn't an exact match as it would be under the floor anyway.
We also ripped out the bulkhead, which was horrible and rusty. We will replace it with plywood and a window.


I thought we were finished with this "mechanical stuff" section, but I was wrong!
As we are nearly finished building I put the van though an MOT last week, as I thought it would be easier to reclassify as a camper with a class 4 MOT (although the current situation with the DVLA seems like it will be unlikely to be reclassified as their rules seem to have changed).
Anyway, it failed the MOT, which I suppose I was not surprised about, but it needed a lot of work done to pass. The MOT when we bought it must have been done by someone who was not looking at this van as there were loads of things that had obviously been broken for a long time.
It needed new back wheel bearings, new brake pads, brake sensing valve cleaning, handbrake adjusting, a whole new exhaust and new wipers (they always say that don't they!)
This is in addition to a tyre and the new headlights (which took ages to sort out and were only eventually fixed when we got some superglue involved) and all the rewiring of the back numberplate light which I had to do myself.
Anyway, the total cost of the mechanical stuff part is now somewhere in the region of £1500, but I am scared to actually work it out as I might cry a bit.
I suppose you have to bear in mind that vans need new brake pads and exhausts and things occasionally and we didn't pay all that much for the van in the first place.
Anyway, the end result is that we now have a van that works and has a real MOT! Hooray!

Continued.....
We also had to get the engine mount re-done again as it the bolt holes were threaded and it was slipping and was in danger of cracking again. The engine had to be removed and sent off somewhere so they could re-drill the holes. While we were at it we also got the clutch done (its only money isn't it). We also got the coolant changed and the cam belt done. It is now pretty much a new van, so I really hope nothing else goes wrong!
We are not going to think about how much it cost to fix the mechanical bits, but it is probably around £2500 or something ridiculous like that. Its a good job this will be our home for a while!