Sunday 30 October 2011

The woodburner


We finally fitted the woodburner, about 1 week before we left for Europe. It is made from 2 gas bottles welded together and I bought it years ago from a man called Geoff in Glastonbury. It used to be in my old caravan, but it will work ok in the van.

We bought single wall flue for the first bit, then twin wall where it goes through the roof so it doesn't get too hot. We also had to buy a bit to convert the single to twin wall, a hat thing/ cowl and a rubber cone thing for the roof to seal ti from the rain. We got it all from the internet. We also got a length of builders band from Wickes (metal strip on a roll for attaching the burner to the floor and walls to stop it from moving) and a granite slab to go underneath to stop the heat (given to us by a friend who makes kitchens).


We sealed the roof with plumber mait putty and silver tape again.


Wednesday 22 June 2011

Reclassification to motor caravan

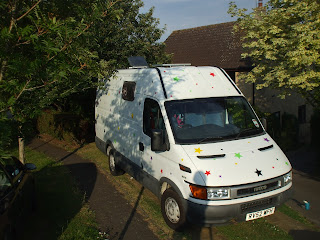
In August we sent off the V5 log book to change the body type from panel van to Motor caravan. I had been reading a lot of information on this on the SBMCC website and over the summer it looked like it was going to be impossible for self builds to reclassify. There was something about the police not being able to tell from the outside what the van was used for. Anyway, I used the checklist that they give you (this is all on the SBMCC website somewhere), and printed out loads of photos with labels for the bed, cooker, seats, table and all the list of things you have to have to reclassify it and wrote a letter that a child could understand to make it really difficult for them to refuse us. In addition we decided to stick loads of coloured stars all over the van. This is going to make it harder to go in stealth mode, but easier to reclassify as it really looks like a camper van now. We can always take them off again if we get hassled too much. 3 weeks later we got the V5 back, and they had changed it without question! Win!

Building furniture

We have built a bed a kitchen unit and a chair. We have been so busy trying to sell everything we own and move out of the house as well as building the van and organising a wedding and haven't had much time to update the blog. I will have to take a lot of pictures tomorrow.

The bed was built from stud work timber and we hope it is solid enough! We got a foam mattress from Ikea and cut it down to fit (about 5 ft 11" long and 4ft 6" wide.


We haven't got anywhere else to put the spare tyre, so it is going to live under the bed. We used some of the old metal rings which were in the van to strap it to the floor. I hope this is safe enough!


(You can also see my dodgy wiring attempt in the corner, the number plate light now runs of a feed from the back passenger light. It works, but you have to remember to disconnect the wire if you are opening the door)
Also we have put down some lino and carpet, which was salvaged from the recycling centre by my friend who works there.


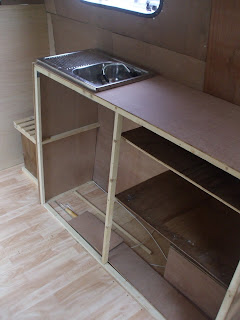
We have built a kitchen from battens and plywood. This is not finished, we need to decide how big the water container and gas bottles are going to be so we can make shelves. My Dad has also pointed out that if we knew how to do proper dove tail or dowling joints we would have saved ourselves a fortune rather than buying loads of aluminium L brackets. They just don't teach anything useful at school nowadays do they?


The sink will go here.

This going to be a chair, made from a recycled Ikea cupboard. Not a toilet as everyone thinks!


Building the overhead cupboards from battens and L brackets


Fold down table and chairs. The leg is removable and fits on the floor to stop the table from swinging around when we drive.

 
 Sink in place, we screwed battens to the inside, glued them down with soudall mastic and put plumbers mait putty along the back edge. You can also see my first attempt at tiling! We used sheets of glass mosaic from homebase.


We worked until 10 on sunday evening and went a bit mad.


I have somehow completely buggered my thumb and it has swollen to about twice the normal size. Would be useful for hitch hiking though.
Here are some photos of the finished van! (minus the woodburner, which we will do in September when it starts getting cold)


 I am very proud of the metal bit with the light mounted in it. The underneath of the cupboard was getting warm when we cooked, so we thought a sheet of metal with an air gap would protect the wood. Keef recycled a metal shelf from work. It was a bit tricky to cut through!


Tuesday 24 May 2011

Window and roof vents (cutting big holes)

We bought 2 old caravan windows on ebay (about £15 each). One has a hinge, but the other one didn't seem to, so we had to drill holes in the top and fit a hinge.
The first thing we did was try to figure out what size hole to cut. This was not easy! In the end we just sort of guessed and cut a hole in an old bit of plywood. We were wrong, so it was lucky we had practiced first! We tried again and eventually got it right. We also cut out some celotex to line the window to roughly the right depth, then mounted the window to check it would close properly.


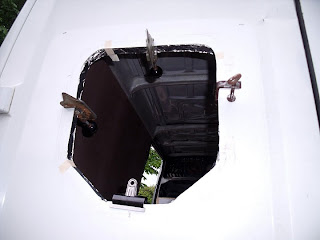
Next we cut a big hole in the van!


Then we cut out a bit of celotex to the right shape and glued it in place.


Then we ply lined the top part of the door. This was a bit tricky as the depth of the window was more at the bottom than the top and we had to pad it a bit.
We realised after we did this that a wooden frame would have been better on the inside of the window, for structure and to attach some kind of closing mechanism, so we had to cut out a bit on the celotex and shove some battens in. (When we did the next window we did this properly).

Then we tried to stick the seal on. The seal which came with the window was not wide enough, in fact I don't think you can buy one which is. Also the depth is not the same all the way round, so we ended up cutting in in half. The inside seal sort of stuck, but we screwed it into place as well. The outside seal would not stick, no matter what we used (glue, non-setting mastic, silicone sealant), and also the window wouldn't close because it was so thick. In the end we gave up on the outer seal and stuck draught excluder foam round the outside edge of the window.
To make sure water doesn't get through and run down inside the ply and insulation we used damp proof  membrane overlapping to the outside by about 2cm, which is very sticky and malleable, and hopefully waterproof! I am a bit worried it might melt in intense heat though.
The window now closes and doesn't seem to leak. The closing mechanism (garden wire and screws) is not really pretty, but it works for now.


We did the same for the second window, but it took about half the time because we knew what we were doing! The closing mechanism is different, we screwed 2 L shaped brackets into the sill.

The outside edge needs tidying up!


For the roof vent we got a proper Fiamma 40cm square vent. (about £50).
We cut a 39cm square hole as instructed. We tried to even out the ridges on the roof with some pliers. We made a frame for the inside using 25x 40mm battens (the depth is 40mm, which is the maximum depth the vent can be, and about the minimum the ply lining and insulation can be). We used the sticky damp proof membrane folded up several times, to act as a seal, both on the vent and around the hole. We screwed the vent on to the frame really tight.


It rained yesterday and it leaked a bit! Damn it! There is a slight dent where water is pooling and seeping through. As the roof is so ridged it was pretty difficult to find a place to put the vent where it would be flat. We will have to try to seal it better before we do the plylining.

In the end we bought some Plumbers Mait putty and shoved that in under the gap. We also pushed the van roof up a bit so the water doesn't pool as much. We sealed around the edges with all weather clear tape and this is now waterproof (fingers crossed)!

Saturday 14 May 2011

Solar panel and electrics

We got 2x 40w solar panels from ebay. ( about £160). We decided that 2 panels would be better than 1 big fixed panel, as now we can attach one flat to the roof (which is inefficient, but convenient as it will always be there) and keep the other one for when we get to a safe place and can get it out and angle it more directly at the sun. I have bought a charge controller (8amp steca, about £27 I think). 8 amps should be over the maximum for both 40w panels connected at the same time ( watts /volts = Amps    so  80/12 = 6.666).
I had a Steca controller in my old caravan and it was easy to use and always worked, so I stuck with that brand.
We bought 2 x88amp hour calcium plated leisure batteries (about £100 from ebay, yes I do love ebay!).  We thought that 2 batteries would be better than 1 big one (122ah) for about the same price. If anything goes wrong we will have a spare, and this way we have more capacity and will hopefully keep them above half way discharged (the charge controller should help with that a bit).
I have also bought a 100amp heavy duty relay and a smartcom self switching relay (ebay about £10 each). This is (the cheapest way) to charge the batteries while the engine is running. This is how other people on the sbmcc forum have done it, so I am copying them! More details on this when I understand how it works.
 Brackets which we bought from B and Q (I feel like I live there at the moment). We got zinc plated L shaped cupboard brackets and bolted them together, then bolted them through the roof. We also got rubber washers to help stop water leaking through and sealed it all up with soudaflex. We were going to seal up the wire in the centre but once we had bolted the panel on we couldn't reach it! It is a tight fit and raised up on a ridge, hidden under the panel, so we decided to seal it from the inside instead.


 Here is the charge controller, the fuse box and a load of wires! I tried my hardest to keep it neat, but failed. We may need to hide this somehow. All the electric things were bought from Vehicle wiring products and The 12v shop. The whole lot cost about £100 (cable is expensive!). The LED lights were bought from ebay.


We build a box for the socket to live in so the wires don't keep falling off. The socket charges the laptop and the phones. There is also a fire extinguisher, just in case!


Here is a light. Working!

I still haven't connected the smartcom to charge the batteries when the van is running. It is sunny at the moment so the solar panel is working fine. We might even sell the second panel (be bought 2x 40w , but only mounted one on the roof).
As we are not running a fridge we don't need that much power and one panel (and a hook up to charge while driving) will probably be enough.

Tuesday 26 April 2011

Insulation and plylining


We have bought 6 sheets of 2.4mx 1.2m x 25mm celotex on ebay. We plan to use this for most of the insulation. I have also bought 2 rolls of 2mm foam underlay from B and q and we have got about half a roll of rockwool which someone gave us.
Our plan is to stuff rockwool into all the metal struts, then cover them with foam. Cut out celotex to fit the big panels, stick them in place with soudaflex (a sikaflex equivalent) and foil tape round the edges.
We will use 6mm ply for the sides and roof, screwed into the metal foam covered struts

For the floor we will just use celotex in between some 25x 50mm battens which will be stuck down with soudaflex . On top of this will be 9mm ply.


Finding weights to make the battens stick down was hard!


 Battens mostly stuck

 Cutting out the template for the ply


 Celotex sheets cut and lying in place with a space for the woodburner, which we are too scared to do at the moment. At some point we will need to get some bolts through here to hold the burner down.


If we were going to do this again we would cut out the ply first, then stick the battens down, as you need to know where the joins between the ply sheets are going to be so you can screw into them. We ended up adding a few more battens because they were in the wrong places!


Rockwool stuffed into the struts and celotex sheets in place- we cut them so they would be a tight fit vertically and would need less glue to keep them in place


   We got paranoid about water vapour and sealed all the celotex and rockwool inslutation in place using silver foil insulating type tape. We used about 5 rolls!
We covered all the big bits of rockwool with either 2mm underfloor foam stuck on with glue (evostick 528 I think, from Jewsons), old camping mats or silver foil bubble wrap. This was to seal it in place, to act as a vapour barrier and to prevent any bare metal from being present to get cold and to condense any water.  The van now looks like a space ship! The silver foil bubble wrap was expensive, so was only used in the areas near where the wood burner will be and on any surfaces which would not be able to be covered by ply lining (like the side door and some on the metal struts).


Nice posing Keef.  The battens were an absolute nightmare to get on! We broke about 3 drill bits, including a titanium one which was supposed to be unbreakable! (Apparently you should drill slowly into metal, using oil to stop the bit getting hot and should not press too hard. We didn't know this). In the end we mostly used self tapping 20mm screws and brute force to get the battens up.
We have put thin plywood battens (about 4mm left over from the old van plylining) in on the edges of some of the struts. This is to pad out to make a flatter surface for the ply, to enable us to glue the ply in some places and to give a bit more strength. We didn't want to lose lots of space by putting thick battens in on the sides, and didn't want to glue directly to the metal (we covered all the metal with foam to stop it getting cold), but did want a bit of extra strength. We put a few extra battens glued onto the back of the ply so that we can have a bit of a thicker attachment for any cupboards. The ply was attached to the horizontal battens by self tapping screws (10mm) and glued as well. This was strong enough to hold it without having to bother drilling into metal again.


We drew in pencil where any metal or wooden struts were, so that we can attach things to them later.


(this is a weird sideways picture of the roof)
Now the roof vent has stopped leaking (we hope) we have put up the ceiling.
We decided to use battens on the metal struts width ways. We were originally going to have battens lengthways, but decided against this in the end as we used 5.5mm ply for the ceiling and it didn't sag or need that much support.
We stuck celotex insulation on with the soudaflex glue and put up some temporary lengthways battens to hold it in place while it dried. We then took out the temporary battens and put up the plywood. It didn't fall off and has not looked dangerous yet!


The roof vent is looking better now and in the background you can see the overhead cupboard and clear perspex window that separates the cab.


To join the gap between the ceiling and the sides we have put a wooden strip of coving.
We have started to wire in the lights behind the coving.

I think we are finally done with insulation and plylining (apart from the side sliding door, which we can't decide what to do with. It has taken about 2 months worth of weekends (although not every weekend), so be warned it is not a quick and easy job!
Now we can get on with painting. Hooray!